Using Mountain High Maps USA Relief with Illustrator
The Illustrator files in your Mountain High Maps USA Relief collection
are saved in Illustrator EPS (encapsulated PostScript) format, and in Illustrator
native AI format, version 9.0, Windows and Macintosh.
The Illustrator files are "vector" files, meaning they can be used
at any size, without requiring any change of resolution--unlike the relief
maps and masks, which are bitmapped, and which may require additional treatment
in an image manipulation application if they are to be used at wildly differing
sizes from the originals.
The Illustrator files are located within thier own state folder
or directory and are identified by the suffix ".eps" and ".ai" as in "arizona.eps."
or "arizona.ai". These files are identical in the Macintosh and Windows
versions and may be ported across platforms.
Layers
When you open one of the Illustrator files, you will be presented
with a map featuring a coastlines, national, state and county borders,
rivers, lakes, railroads, major and main highways, cities, names, graticules
(lines of latitude and longitude). To get the full benefit from these
files, make sure you have the "Layers" floating palette open by choosing
"Show Layers" from the "Windows" menu. You will see from the Layers palette
that not all layers are checked. By clicking at the left hand box of any
other layer name a "eye" appears, and that layer becomes visible.
The features are as follows:
Box rule: This is a 1 point black box rule of precisely the same
dimensions as the corresponding state relief maps on your MHM-USA Relief
state folder or directory.
Graticules: This is a 0.5 point red line showing the meridians of
longitude and parallels of latitude, each plotted at 1 degree intervals.
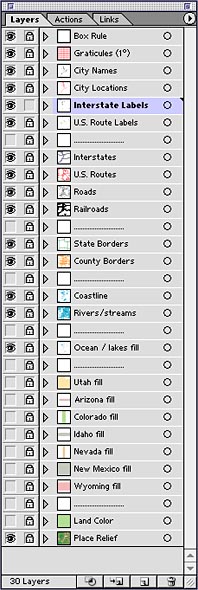 City names: This layer displays the names in 5 pt Helvetica black of
all of cities and towns featured on the opened map.
City names: This layer displays the names in 5 pt Helvetica black of
all of cities and towns featured on the opened map.
City locations: These are 3 pt diameter red dots indicating the
locations of major cities and towns.
Interstate labels: These are custom road sign symbols used to label the Interstates throughout the map.
U.S. Route labels: These are custom road sign symbols used to label the U.S. Routes throughout the map.
Interstates: These are visible as paths with a custom double line stroke. Interstates are shown in blue, while Toll Roads are shown in green.
U.S. Routes: These are visible as a 1 point red path.
Roads: These are visible as a 0.5 point grey path.
Railroads: These are visible as paths with a custom railroad tie stroke in black.
International borders: These are visible as 0.5 point magenta paths.
State borders: These are visible as 0.25 point green paths.
County borders: These are visible as 0.25 point orange paths.
Coastline: This is visible as a 0.25 point (hairline) blue path.
Rivers/Streams: These are visible as 0.25 point (hairline) blue paths.
Ocean/Lakes fill: This layer contains cyan fills for lakes and inland
water areas.
State fills: These layers contain specific colored fills for each state.
Land color: This layer contains a green fill for all of the land area.
Place relief: This layer is empty and is provided for placing one
of the state relief map images, so that all other layers are stacked above
it.
There are a number of empty layers which are left blank and are inserted
to provide an aesthetic break between similar groups of layers - they can
also be used to add your own artwork material. As a matter of discipline,
safety and future versatility, it is advisable to create a new and separate
layer for all new information you add to the map, thereby leaving existing
layers undisturbed, and giving you the future option to remove or edit
your personal artwork.
Placing the relief map
With the layers palette open, either use the top right arrow to lock all layers, or individually click to lock all layers that do not show the striked out pencil in the second column. At this point, unlock the last layer "Place Relief" and click on the layer title so that the layer is highlighted blue, then make sure the "Eye" view column icon is also switched on. This effectively limits any changes to be made only to the relief image layer.
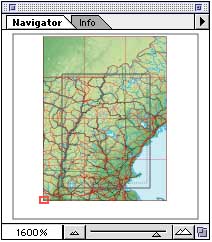
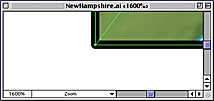 From the file menu, select "Place Relief" and Select a pre-colorized state relief map or the grayscale relief map from the state folder or directory, then click "Place". You can of course open a similar state map that you have customized for this purpose. The image will load and place itself behind all the visible vector material, however, it may not locate exactly to the vector map coordinates. Using the Select Tool (not the Direct Selection Tool), adjust the location of the background map until it appears directly in line with the outline box of the total state image. To finalize this step, it is essential to zoom in, as much as 1600 to 2400% on to the four corners of the map box to make sure the relief image is exactly in line. Whilst the relief image is the only selected and editable item, small adjustments are possible using the cursor up, down and side keys, or using the mouse, minor adjustments can be made so that, at high zoom, the relief image lines up exactly with the outer box. Check all four corners before locking the relief image layer. One helpful tip is make sure you have the Navigator palette open so that you move quickly from corner to corner of the work area
Editing Maps within Illustrator
To edit individual layers in the Illustrator file, make sure you
have the "Layers" floating palette open by choosing "Show Layers" from
the "Windows" menu. To view all the layers click on the left hand box of
any layer that does not have an "eye" open to make it visible.
To edit a specific item on a layer, whilst it is possible to do
so by directly using the Selection Tool, it is safer to Lock the layers
you are not working on for safety and to prevent inadvertent change.
In the Layers palette, the second column controls editing access to each
layer. Locking is "on" and indicated by a pencil with a strike mark
through it, "off" by a empty box. Starting with all layers with Locking
on, click on the pencil to select the layer requiring editing.
With one layer unlocked, you can use either of the two Selection
tools to make changes, delete or add new material. For global layer
changes, use Select All to select all items on one specific layer, for
example the railroad layer, then using the stroke palette, it is easy to
modify the thickness of the railroad line (set to 0.35 pt default) to another
size in one easy action. Likewise, the color may be changed in one
action. Similarly, text layer fonts and size may be modified with ease.
When you have finished your modifications, reset the protection,
and move on to another layer. Multiple layers may be set unprotected
if the Select All action brings together common features on several layers
to edit simultaneously.
Outputting Maps from Illustrator
To use the Illustrator files in other applications, export your
document as an EPS file -- choose "Save As..." from the "File" menu. Some
applications, such as Photoshop and FreeHand (later versions only), will
open Illustrator files directly.
However, there is one important thing to remember when you export
a map from Illustrator as an EPS file.
 |
MHMtip
ADJUSTING COLORS ON RELIEF MAPS
Illustrator
version 7.0 or later allows you to place the colorized relief maps and
adjust the colors directly from within Illustrator. It will also convert
the RGB files to CMYK for output as separated film for color printing. |
Preventing Layers from Printing or Exporting
Although they may not be visible, some layers of your map will be
included when you output the document--either when you print it, or when
you export it as an EPS file. The solution may seem obvious--just delete
the layers you don't want. However, you may want to keep the invisible
layers for later editing. If so, do the following:
Highlight the layers you don't want to export by clicking on each one
while you hold down the shift key. Choose "Layer Options" from the pop-up
menu at top right of the "Layers" palette.
Uncheck the "Print" box in the "Layer Options" dialog. Click "OK."
The affected layers will now neither print nor export with the document.
MHMtip
PRINTING COMPLEX PATHS
The
Illustrator versions of Mountain High Maps USA Relief are constructed
with high cartographic integrity, and consequently they are made up of
very complex paths. This can present problems when printing with low amounts
of printer memory (identified as "limitcheck" errors) if left as joined
paths. Because Illustrator limits the number of points in a path when printing
-- some of the map outlines contain many thousands of points -- we have
split more complex areas into smaller chunks. |

USA Relief Maps ~ Digital Wisdom Inc ~ PO Box 11 ~ Tappahannock VA 22560 ~ USA
800-800-8560 | 804-443-9000 | Email
© Digital Wisdom, Inc.
Any comments or problems with this site? Please let us know - thank you!

