Sizing Images
If you are used to working with EPS (encapsulated PostScript) files,
you will know that it is possible to reduce or enlarge an image without
loss of quality. This is because the information used to generate the lines
and shapes in your image is stored in a series of mini databases, called
"vectors" which describe a line exactly the same regardless of the final
image size. The only thing that affects the quality of a vector-based image
is the resolution of the device being used to display or print it. Vector-based
images are generally described as "draw" graphics. The Illustrator, CorelDRAW,
and FreeHand files on this disc are draw graphics, and can be output at
any size without loss of line quality.
Photographic images, however--such as the grayscale relief images
on your Mountain High Maps discs--are made up out of thousands of individual
square dots, called "pixels," which, when viewed collectively, merge together
to give the illusion of a continuous tone image in much the same way that
a halftone screen does. Consequently, the quality of the final image depends
as much on the number of pixels in the image as it does on the frequency
of halftone ruling--when you enlarge an image, the pixels get bigger and
more noticeable. Pixel-based images are generally described as "paint"
or "bitmapped" graphics.
The rough rule-of-thumb guide for determining the final resolution
of a pixel-based image is to give it around twice the number of pixels
per inch as you will give it halftone lines per inch. Thus an image to
be printed with a halftone screen of 150 lines per inch (lpi) should have
a pixel resolution of 300 pixels per inch (ppi)--which is the highest resolution
of Mountain High Maps USA Relief images. In practice it is generally okay
to give a map image a slightly coarser pixel resolution--even as low as
150ppi--without noticeable deterioration in quality. If you intend displaying
your maps only on a monitor, 72ppi is sufficient (provided you don't enlarge
them), since that is the resolution of most monitors.
Making Images Smaller
If you intend outputting a map image at a smaller size, you will
be able to do so with most applications which allow picture re-sizing.
The quality of the output image will be unaffected, since by reducing the
image size, you are effectively increasing its resolution--a 300 dpi image
reduced by 50% will have an output resolution of 600 dpi. A reduction smaller
than 50% becomes a bit cumbersome, especially if you are using many images,
since the file size of the image remains the same, regardless of how much
you reduce its dimensions. To change the resolution of the image--and thus
reduce its file size--you must "resample" it (see below).
Making Images Larger
Enlarging images can be more problematical. As explained above,
when you enlarge a pixel-based image--in whatever application you use--you
also enlarge the pixels until you reach a point when the pixels themselves
become visible to the naked eye. Although making enlargements in your page
layout or drawing application is less demanding on disk space and makes
output faster, you may notice loss of output quality if you enlarge more
than about 180%, although the degree of quality loss depends just as much
on the halftone screen ruling you will use. To minimize loss of quality
when enlarging an image, you must "resample up."
Resampling
To change the pixel resolution of an image as well as its linear
dimensions, you must "resample" the image up (enlarge it) or down (reduce
it). Resampling uses a process called "interpolation" to modify pixel information.
You can see some resampling examples on page 23. You cannot resample a
pixel-based image with a page layout or drawing application--you must use
an image-editing application such as Photoshop. To resample an image in
Photoshop, first check its current resolution. A quick way of doing this
is to hold down the Option or Alt key while clicking on the image size
box in the lower left of the window.
Then, to resample up:
-
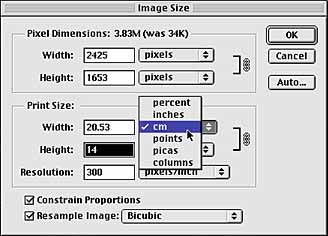
Select "Image Size..." from the "Image" menu.
-
In the dialog box that appears, make sure that "Constrain: Proportions"
remains checked if you want the proportions of your image to remain the
same, and check "Resample Image"--"Bicubic" is best.
-
In the "Print Size" portion of the dialog box enter either the height
or width that you want the image to be (select your preferred unit of measurement
from the pop-up menu alongside the box where you are entering your new
size)--the value in the other box will adjust automatically provided the
"Constrain: Proportions" box is checked. Click "Okay."
| Use the "Image Size" dialog box to change the dimensions
of an image. To make sure that the image stays at 300 ppi after you have
altered the size, check "Resample Image." |
 |
Sharpening the Image
If you resample an image by a considerable amount, it may end up
slightly blurred. You can compensate for this by using Photoshop's "unsharp
mask" filter as follows:
-
After you have resampled your image, select "Sharpen > Unsharp Mask..."
from the "Filter" menu.
-
The dialog box opens with default settings. To see how much these affect
your image, Click "OK." You may need to play around with the settings to
get a desirable result, but an amount of 200% (you can go up to 500%),
with a four pixel radius and a Threshold of four levels usually produces
good results with a 300dpi image.
PREVIOUS | MENU
| NEXT

USA Relief Maps ~ Digital Wisdom Inc ~ PO Box 11 ~ Tappahannock VA 22560 ~ USA
800-800-8560 | 804-443-9000 | Email
© Digital Wisdom, Inc.
Any comments or problems with this site? Please let us know - thank you!

